
If you want your fence to sit at a specific angle on a slope, you’ll need to plot out the right curve using basic math and landscaping skills. Using a 3-foot, 4-foot, and 5-foot mason’s string, Pro Angle Fencing Summerville can create a triangle to plot the correct angle for your fence.
Sometimes, when installing fences, we come across angles that could be a better 90 degrees. It is often due to the nature of the ground or garden, and we need a way to cope with these angles to ensure a smooth finish and a safe and secure barrier around the park. There are a few ways of doing this, but one of the most common is to use angle brackets on end posts. These allow you to set the fence at various angles by attaching them to a blank post and then using them to angle a fence panel. This method of bending a fence run is versatile and can be used to create curved fencing or fences around trees, walls, and other obstacles in the garden.
Another option is to install a racked fence. It involves constructing the wall in stepped sections. It means the rails are installed perpendicular to the posts, but each area is installed at a lower elevation as you move downhill. It allows the fence to follow the slope of the ground and reduces the gaps created by a wall constructed on level land.
A third option is to dig the posts at an angled angle. It is a little more labor-intensive but can be very effective in creating an attractive and functional fence on a steep slope. The only downside is that the post may need to be completely flush with the ground, meaning you must add gravel boards to prevent water seepage.
Fencing has now introduced angled fence posts specifically designed to solve this problem. These can be used the same way as a standard line post, allowing you to make up to 30-degree angles in a fence run.
Installing a fence on a slope is a project that requires special care. The ground may need to be leveled before construction begins, and fence posts should be set deep enough not to be visible after the installation. A professional can advise you on how to accomplish this best. In addition, the fence should be regularly checked for signs of damage and warping due to the slant of the ground. Keep growth away from the wall to prevent moisture and ensure it is not under stress, such as by leaning items against it for long periods.
Before laying out the fence line:
- Mark the location of the corner and end posts.
- Dig holes for these posts using a shovel or post-hole digger, ensuring they are at least as deep as the frost line in your area.
- Use a level to check the height of each post against the ground, and make adjustments if needed.
Next, determine the drop for each fence panel by stringing a mason line from the top corner stake down to the bottom. Measure the distance between the bar and the ground to get a measurement for the drop, which you will then divide by the number of panels to find the appropriate height of each. Mark this height on the first post and repeat the process for each meeting.
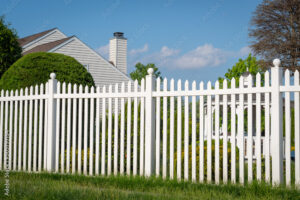
When installing a fence on a slope, it is important to consider how you can use angled rails and posts. A stepped wall is a good choice because it allows the fence to follow the slope while maintaining a vertical appearance. However, this style of fence can have gaps under the lower panels, which could allow small animals or debris to pass through.
, a racked fence is often the better option to avoid this. This type of fence uses angled panels that adjust to the ground’s contour, allowing the wall to hide any gap between the tops and sides. When constructing a racked fence, it is important to angle the ends of metal rails before connecting them to the posts, as this will help minimize the gap’s appearance.
Fences serve various functions: they define property lines, provide privacy, help keep pets and children safe, and offer curb appeal. But not all yards are flat, so a standard fence can’t always be built on uneven terrain or sloped lawns without compromising strength and stability. In those cases, barriers are often installed on a stepped angle rather than at a straight vertical height to allow the fence’s rails and pickets to follow the contour of the yard or land.
Depending on your community’s codes, you may need to obtain a permit to build a wood fence, and you will likely have to observe set-back restrictions from neighbors and property lines. Getting the proper tickets can help you avoid the hassle of a costly project that violates local regulations. Before starting construction, it’s a good idea to have utility companies mark the locations of any underground services in the area you plan to work.
To determine the ideal angling for your fence, stake out the perimeter with tall stakes and string or a mason line. Then, use a carpenter’s square to check the corner of the line for an accurate right angle. Using this information, you can mark the spot for your first post-hole and dig it with a post-hole digger. Repeat the process at each staking point and with the line running down to the next one, adjusting it as needed to ensure that all posts are on a straight line.
If you purchase pre-constructed fence panels, they will have a built-in right angle and be ready to accept your angled posts. If not, you can buy standard pre-punched posts and notch them on-site to fit the angled post mounts. Be sure to miter the ends of the rails to prevent them from pulling away from the posts as the fence ages.
When your first fence panel is in place, you can add the level rails and the angled pickets. Before attaching the pickets, you should consider whether or not to leave a gap under the fence for access and safety reasons.
There are several ways to angle fence posts to make a stepped fence. One way is to use angled fence brackets attached to the bottom of a fence panel and then slotted into the fence post. Another way is to use a pair of fence posts with pre-punched holes. This method allows you to add an angled section without punching the holes on-site. It is often used for stair-stepping a fence up a slope or stairs.
A third option is to use a miter or radial arm saw to cut the top of the fence post at an angled angle. It’s important to make the angled cuts uniformly so that all the seats are at the same height. It will ensure the position is stable and won’t shift over time. It’s also important to treat the angled cuts with a wood preservative, stain, or paint to prevent decay and insect infestation.
If you use a wood preservative, use one safe for in-ground contact with groundwater and will not leach into soil or runoff. You should also avoid using pressure-treated wood treated with arsenic or other toxic chemicals.
Before cutting, it’s a good idea to lay out your planned fence line with stakes. It will show how many drops you need to build a racked fence. After you’ve laid out the line, mark the proposed locations of your fence posts with a string and a plumb bob. Then, dig the holes for your seats at least 2 feet deep.
When you’re ready to install your racked fence, start by placing the first post. Measure down from the top of the first post according to your drop measurement (in this case, 4 inches). Then, string a line to the next post and mark it where you’ll need to cut off the top of the second post. Repeat this with each post until you have a full length of racked fencing.